A wake-up light is a type of alarm clock that gradually increases the light level in your room before your alarm goes off, simulating a natural sunrise and helping you wake up feeling more refreshed and alert. In this article, we’ll show you how to build your own wake-up light using a Raspberry Pi and control it with Python code.
The first thing you’ll need is a Raspberry Pi. The Raspberry Pi is a small, low-cost computer that includes built-in WiFi and Bluetooth, making it ideal for projects that require wireless connectivity. You’ll also need an LED strip, a power supply, and a few other components to complete the project.
To start, connect the LED strip to the Raspberry Pi. The LED strip should have three pins: ground, data, and power. Connect the ground pin to a ground pin on the Raspberry Pi, the data pin to a digital output pin on the Raspberry Pi, and the power pin to the power supply. Make sure to use a suitable power supply for the LED strip, as using the wrong power supply can damage the LED strip or the Raspberry Pi.
Next, write the code to control the LED strip. The code should include the following steps:
- Import the necessary libraries, such as
RPi.GPIOandtime, to access the GPIO pins and time functions on the Raspberry Pi. - Set up the GPIO pins. This will allow the Raspberry Pi to control the LED strip.
- In the
setup()function, initialize the LED strip. This will set the initial brightness level and other parameters for the LED strip. - In the
loop()function, use thePWM()function to control the LED strip. ThePWM()function allows you to set the brightness of the LED strip by specifying a value between 0 (off) and 100 (full brightness). You can use this function to create a gradual increase in brightness over time, simulating a natural sunrise.
Here’s an example of what the code might look like:
import RPi.GPIO as GPIO
import time

# Set up GPIO pins
GPIO.setmode(GPIO.BCM)
GPIO.setup(18, GPIO.OUT)

# Set up LED strip
ledStrip = GPIO.PWM(18, 100)
ledStrip.start(0)

# Set up wake-up time and brightness level
wakeUpTime = "6:00"
brightnessLevel = 0

def setup():
  # Initialize LED strip
  ledStrip.ChangeDutyCycle(brightnessLevel)

def loop():
  # Check if it's time to wake up
  currentTime = time.strftime("%H:%M")
  if currentTime == wakeUpTime:
    # Gradually increase the brightness of the LED strip
    while brightnessLevel <= 100:
      ledStrip.ChangeDutyCycle(brightnessLevel)
      brightnessLevel += 1
      time.sleep(1)
Once the code is executed on the Raspberry Pi, the LED strip will gradually increase in brightness at the specified wake-up time, simulating a natural sunrise. You can adjust the wake-up time and brightness level by modifying the wakeUpTime and brightnessLevel variables in the code.
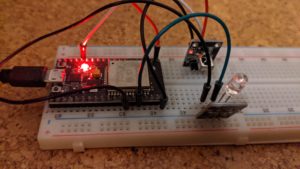
The LED strip is connected to digital output pin 18 on the Raspberry Pi, which is controlled by the PWM function in the code. The positive leg of the LED strip is connected to the digital output pin through a 220 ohm resistor, and the negative leg is connected to a ground pin on the Raspberry Pi. This configuration allows you to control the LED strip using the PWM() function in your code.
A breadboard can be used to make the connections between the Raspberry Pi and the LED strip. The jumper wires are inserted into the breadboard to connect the positive and negative legs of the LED strip to the corresponding pins on the Raspberry Pi. The breadboard makes it easy to experiment with different configurations and to change the connections without having to solder anything.
Just remember to use a breadboard and jumper wires to make the connections, and to orient the LED strip correctly to avoid damaging it.
To run the code on the Raspberry Pi, save the code in a file with a .py extension and use the python command to execute it. For example, you might use the following command to run the code:
python wake-up-light.pyOnce the code is running on the Raspberry Pi, the LED strip will gradually increase in brightness at the specified wake-up time. You can also add additional features and functions to the code, such as a user interface to control the wake-up light or a timer to automatically turn the light off after a certain amount of time.
In conclusion, building a wake-up light with a Raspberry Pi and Python code is a fun and practical project that can improve your morning routine and help you wake up feeling more refreshed and alert. With a few basic components and some simple code, you can create a custom wake-up light that is tailored to your specific needs and preferences.